|
To manage and track Mac
printing, the Mac computer must print to the shared
printer on any Windows computer. If the printer is not shared on any Windows computer, you can share
the printer on the Windows computer that has
Print Job Manager installed.
To set up the PC, share
the printer on the network and then connect to the
printer from the MAC, follow the steps below for the
PC and the MAC.
First,
Enable the LDP Print Service using the following
steps:
1.
Click Start, and
click Control panel
2.
Click Programs and
then click Programs and Features
3.
Click Turn Windows
Features on or off
4.
Click to expand Print and
Document Services
5.
Check the box for LDP
Print Services
6.
Click OK and close
the Programs and Features window
Next, share the Windows
printer on the network using the following steps:
1.
Click Start,
type Devices and Printers in the Search text
box
2.
Click Devices and Printers from
the list above
3.
Right-click on the printer to
be shared and click Printer properties
4.
Click the Sharing tab
and click Change Sharing Options
5.
Check the box to Share this
printer
6.
Set the name for the share
(Tip: use a share name with no spaces, Example:
Windows_HP_Printer)
7.
Click OK and then
close the Properties and Devices and
Printers Windows
Step 2. On the Mac
The last step,
connect the printer to the MAC using the following
steps:
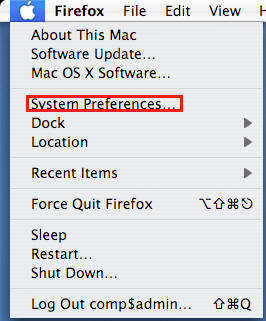
1. Launch System Preferences from menu.
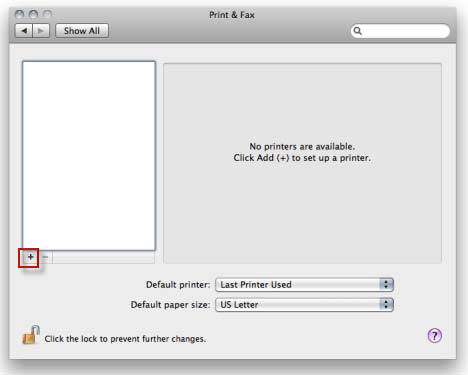
2. Click the ‘Print & Fax’ icon in the System Preferences window.

3. The
Print & Fax window will display a list of currently
configured printers and faxes that your Mac can use.
4. Click the plus (+) sign, located just below the list of installed
printers.
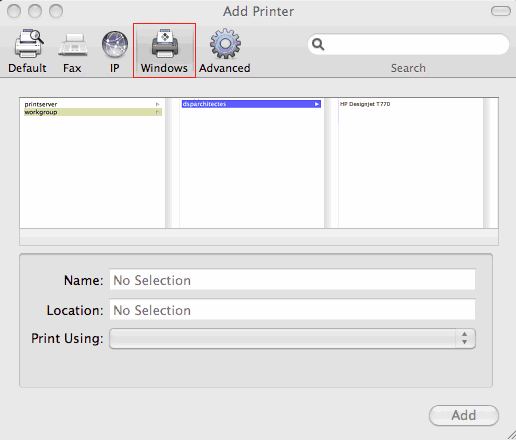
5. The printer browser window will appear.
6. Click the ‘Windows’ toolbar icon.
7. Click the workgroup name in the first column of the three-pane printer
browser window.
8. Click the computer name of the Windows machine that has the shared
printer connected to it.
9. You may be asked to enter a user name and password for the computer you
selected in the step above.
10. Select the printer you configured for sharing from the list of printers
in the third column of the three-pane window.
11. From the Print Using dropdown menu, select the driver that the
printer needs. The Generic PostScript Printer driver
will work for almost all PostScript printers, but if
you have a specific driver for the printer, click
‘Select a driver to use’ in the dropdown menu, and
select the driver.
12. Click the ‘Add’ button.
13. Use the Default Printer dropdown menu to set the printer you want to
use most often. The Print & Fax preferences pane
tends to set the most recently added printer as the
default, but you can easily change that by selecting
a different printer.
Common Issue:
Mac OS X Cannot locate a shared Windows printer
Summary: In Mac OS X 10.3 and later, Printer Setup Utility allows you to
add a printer that's being shared by a Microsoft
Windows PC. However, Printer Setup Utility may not
see some shared Windows printers.
Here are some reasons why and what you can do about it.
The
printer name contains more than 12 characters
Only printer share names that contain 12 characters or less will be
displayed in Printer Setup Utility when browsing for
a Windows printer.
Incorrect Windows username or password when adding a Windows
printer
Printer Setup Utility will prompt you for a username and password when
adding a shared Windows printer. These fields can be
left blank if the computer sharing the printer is
set up to allow guest users to see and print to the
shared printer.
If the computer that's sharing the printer is set up so that only specific
users can see the printer, the printer list will be
blank if the wrong user (or no user) is entered.
Contact the administrator of the computer sharing
the printer to determine what username and password
to use.
The computer sharing the printer is on a different subnet
Printers shared by Windows PCs that are on a different subnet than your Mac
will not be listed.
The shared printer's comment contains special characters
If one of the shared Windows printers has a Return character (which isn't
displayed) at the end of its comment (description),
any printers that should appear after it will not be
displayed. To resolve this, go to the computer
that's sharing the printer and remove any Return
characters (or other special characters) from the
printer's comment.
If you just want to
track the Mac printing, Print Job Agent for Mac is
not required to be installed on Mac clients. Skip the following Step 3.
Step 3.
Print Job
Agent for Mac provides the following additional
features:
1. Enables users to
confirm or cancel the print jobs in the print
notification popup before the print jobs print.
2. Enables users to enter
user ID and (or) PIN before the print jobs print.
3. Enables users to enter
or select a client billing code/job code/project
code before the print jobs print.
Mac OS X/Classic:
PrintJobAgent.app.tar and tracker_ip.ini
1.
Open tracker_ip.ini, Enter the computer name or the IP Address of the computer (For example 192.168.0.10) that has
Print Job Manager installed.
2.
Copy PrintJobAgent.app.tar and
tracker_ip.ini to Mac computer.
3.
Double-click PrintJobAgent to run
it. If it doesn’t run, try a different agent.
4.
You can make agent run
automatically when Mac machine starts up:
Option 1:
Step 1: Find the PrintJobAgent
application icon and click on it.
Step 2: Click on the File menu
and select Make Alias. Drag the alias to the desktop
where you can get at it.
Step 3: Double-click to open
the System Folder and locate the Startup Items
folder.
Step 4: Drop the alias into the
Startup Items folder. The next time you start up
your Mac, the application will launch.
Option 2:
Go into the system preferences
- accounts - login items, you can adjust what
programs load and don't load at sign in.
|